 250,000m+ Digidrive Guide
Written by Zynx. Screenshots by Zynx.
Note: Hover over each image to see a caption.
Intro
This guide is for all those who are seeking gargantuan scores in Digidrive. I will only briefly cover the basic mechanics to the game, if you need more details, check GameFAQs or something.
However, before you read this guide, I highly encourage you to discover as many layers of this game as you can, by yourself. Digidrive is game that has many levels of depth, and this process of understanding more and more of the game can be as enjoyable as obtaining high scores. You will encounter many “Aha!” moments, where you realize a new method of attacking the game that can multiply your previous high scores. When I first played this game, I was very impressed with a score of 12,000m. But with the gradual and fun discovery of various techniques, that’s now a mere fraction of my record.
While this guide focuses on single mode, it also directly applies to VS mode when items are off. When items are on, you need to play a little differently due to item powers. The general techniques are still just as applicable, especially in pile build up, but likely you will be cashing in your piles long before they reach maximum size.
The difficulty mode acts as a multiplier for your attack distances, so Expert difficulty is a must. (In modes other than Expert, the multiplier is not high enough to produce 15,000m stockpiles, which are important for reasons you will discover later.)
When you are aiming for high scores, there are basically only two phases to the game, the Build Up, and the Cash In.
The Build Up phase focuses on creating a maximum sized stockpile that will result in the advancement of just under 15,000m when fired.
One the maximum stockpile has been achieved, the Cash In phase focuses on getting as much distance as you can, before you mess up and lose the stockpile, and need to restart the Build Up mode.
Basics
Briefly, here are the basics.
D-Pad – pressing any direction on the D-pad will direct moving pieces in that direction. However, you are not able to direct pieces towards the direction they came from.
A – release one of your stored attack pieces.
B – cut short the scene that plays as you successfully attack a stockpile.
Start – pause menu
The objective of the game is to build up stockpiles, then use attack pieces on them to convert them into meters. Two types of pieces exist – the three different shaped pieces, and attack pieces.

Stack 5 of the same shaped piece in one direction to begin a stockpile. Add more multiples of 5 of the same shape to the same direction to grow the pile. However, if you direct a different shaped piece to a direction where there already are pieces, but no stockpile, those pieces will be forced out by your new piece, and will return towards the center. If you direct a different shaped piece to an existing stockpile, that stockpile will be eliminated, but an amount equal to that stockpile will be added to every other stockpiles that are currently in existence, if any. Stockpiles fade quickly with time, once the time runs out, the stockpile disappears. However, directing a matching piece towards the stockpile will reset its timer.

Attack pieces naturally appear every so often, but the player can also release one from up to 3 that they have stored up. When an attack piece is directed at a stockpile, that stockpile is removed and added to your score. If the attack piece is directed at a place where there are pieces, they will be forced to return to center. Otherwise, it does nothing. You gain a single attack piece for storage when you achieve an autobahn (discussed later), and also for every 15,000 meters you score.
At the right of the screen is a disc and a plunger. The plunger creeps towards the disc with time, and if it touches, your game is over. However, a successful attack will move your disc away from the plunger, in addition to adding to your score.
Techniques
There are many general techniques you should know before you embark on your goal:
The Autobahn

If you are able to form stockpiles in all 4 directions simultaneously, you can quickly build up piles and gain an additional stored attack piece, if you have less than 3. During an autobahn, every shaped piece counts for 5 times its value, but if any stockpile dries, or if you direct the wrong shape to a pile, that pile is immediately scored, instead of the usual elimination and add to other piles. However, using this increases the game speed considerably after you’re done, so avoid it when you don’t need it, to extend your long term survival. However, at the beginning of the game, when you have shaped pieces of only 1 color, it’s worth it to form an autobahn immediately and build your stockpiles to around hexagon-size or more, to get a head start on the first Build Up phase of the game, and a spare attack piece for storage. In high score play, autobahns are most important for gaining a stored attack piece, because, if you run out, you cannot quickly cash in your stockpiles, and have no defense against the approaching plunger if an attack piece does not naturally come your way. But try to avoid using autobahns unless you have only 0 or 1 attack pieces in storage.

There are various ways to form an autobahn later in the game, but only one will be mentioned here. First, form a stockpile for each color. Then, choose a color and direct only pieces from that color to the remaining free direction, while directing other colored pieces towards their stockpiles. If a colored piece comes from the direction in which its stockpile is located, direct it to the direction you’re attempting to gather pieces, and change the color you are aiming to gather to this new color.
Normal pile maintenance

If you play conservatively, 3 of the 4 directions will each be assigned a different color, so that all pieces of that color are directed there. In this manner you can maintain 3 separate stockpiles without putting any of them at risk. The remaining direction is kept as a ‘junk’ pile, used to direct a colored piece when it emerges from the direction in which its pile is located, preventing it from being directed to that direction.
However, if you play aggressively, you will also try to use that 4th direction to build another stockpile, which will match the color of one of your other piles. Sometimes you will get a piece that doesn’t match though, and will have to sacrifice your 4th direction in order to preserve your other 3 piles (or, better, sacrifice the pile in the first 3 that has the same color as the 4th pile). Learning how to do this will increase your effectiveness at getting high scores, as you will be able to form small stockpiles more quickly for use in stockpile transfer and doubling (more on this later).
Stockpile transfer
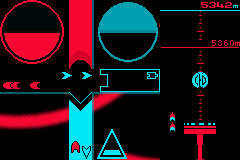
![]() Before – A large stockpile to the right, and a tiny one up top
Before – A large stockpile to the right, and a tiny one up top
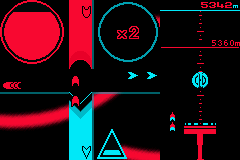
![]() Transfer – A nonmatching piece is directed to the right pile
Transfer – A nonmatching piece is directed to the right pile
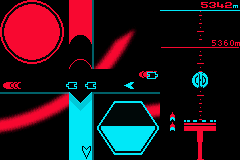
![]() After – The right pile is now gone, but its contents have been added to the top pile, which is now large
After – The right pile is now gone, but its contents have been added to the top pile, which is now large
If you have two stockpiles, and you crash a non-matching piece into one of them, its contents are removed and added to the other stockpile. Normally, this doesn’t gain you anything, but this is important to buy time if your large stockpile is about to fade away. The larger your stockpile is, the faster it fades away. However, when a stockpile is counting up, due to stockpile transfer or stockpile doubling, it does not begin to fade until the transfer is complete. This is an essential technique to maintain your large stockpile, because otherwise it fades in the blink of an eye.
Stockpile doubling
 Before – Large stockpiles to the right and top, with a small stockpile downwards
 Doubling – A nonmatching piece is directed to the right
 After – Now, the downwards pile is just about equal to the size of what was in the right pile, while the top pile is even larger, equal to its previous size plus the size of the right pile
Stockpile doubling is the most important technique to high scores. If you have three stockpiles, and you crash a non-matching piece into one of them, then its contents are doubled: an amount equal to the original stockpile is added to BOTH the remaining piles. This technique is the most essential technique, both for the building of large stockpiles and for the duplication of x? maximum stockpiles.
For the purposes of stockpile transfer and doubling, learn to build minimum sized stockpiles quickly (simply direct 5 pieces of the same color to one direction). This minimum sized stockpile is as good as any other to transfer to or double to. Building up stockpiles using normal means (by directing additional multiples of 5 pieces of the same color to a direction) is far too slow to be useful when aiming for massive scores.
Ok, those are the techniques you’ll need. Practice them until they’re very familiar to you. Now, the 250k+ method.
The Method
Begin with the (initial) Build Up phase:
2 tools are useful for this phase, the Autobahn, and Stockpile Doubling. At the beginning of the game, use the Autobahn to build stockpiles to at least hexagon levels. Then, with the 3 piles remaining, stockpile double the largest one, then stockpile transfer one of the remaining ones to the other. (The stockpile transfer is often required because maintaining 2 piles of the same color is usually difficult because of the pieces you’ll receive.) Build up 2 minimum sized stockpiles, and stockpile double. If the remaining 2 stockpiles are of different color, do NOT stockpile transfer to combine them. Instead, build up a minimum sized stockpile, and then stockpile double one of the 2 large stockpiles (with preference to whichever pile is larger, when possible). Keep repeating these steps until you have a x? maximum stockpile. Always maintain 2 large stockpiles so you can utilize attack pieces that the game provides naturally, and still have a large stockpile remaining. You need to rely on attack pieces given to you by the game to cash in stockpiles to prevent game over, rather than the ones you have in reserve in this phase, or you’ll run out very quickly. (You can resort to autobahns to gain reserve attack pieces, but the speed up is not worth it if you’re aiming for the highest score you can possibly get.)
In the build up phase, you have 3 risks:
- The plunger hitting, game over – avoid this by utilizing attack pieces the game gives to you on one of the two large stockpiles you have been maintaining
- Running out of reserve attack pieces when you need it – avoid this by not using your reserve attack pieces, use the ones the game gives you instead – However, if you hear “Danger” – you will have to use up one of the attack pieces you have stored, to prevent the game from ending
- Losing your large stockpile – match the correct color piece to refill the stockpile fading, or transfer or double the stockpile to keep it alive
Cash In phase:
Once you create a x? maximum stockpile and have an attack piece in reserve, enter the Cash In phase. Create 2 minimum sized stockpiles, and stockpile double. Call one of your reserve attack pieces and cash in one of your new x? maximum stockpiles. You should gain just under 15,000 distance, and another reserve attack piece. Keep repeating these steps until you make a mistake and lose all your large stockpiles.
Note: It is important that the stockpile scores about 15,000, because if it doesn’t, you won’t get back an attack piece in storage for each one you use, and will run out quickly. And if you run out of stored attack pieces, you cannot cash a stockpile as soon as you do a doubling, as you will have to wait for an attack piece to naturally appear, and you will score at a much slower rate.
In this phase, you still have the same 3 risks, but with enough skill, the only real risk is losing your large stockpile.
Once you lose your x? maximum stockpile, you’re back to the build up phase. However, I try to avoid autobahns and build up using stockpile doubling from scratch, because multicolor autobahns at this stage provide relatively small gains, while speeding up the game significantly. Once you reach x? maximum again, back to Cashing In.
Make every effort to maintain your large stockpile, utilizing stockpile transfer to prevent it from disappearing, because each time you return to Build Up, the game will continue to increase in speed while you are not scoring big. However, avoid stockpile transfer unless it is absolutely necessary, because doing so removes a small stockpile that you could have used for stockpile doubling, if you had another one.
There are two particular things to keep an eye out for. Just after you cash in a large stockpile is when things are most vulnerable. You only have one large stockpile, and no small stockpiles to transfer to, so if that single stockpile disappears, you’re back to Build Up. Build another small stockpile as quickly as you can. Also, when pieces are coming from the direction in which your large stockpile is located, you may never get a chance to direct a piece towards that pile to save it from fading away.
Alternative Techniques
This guide is merely a starting point to expert play, despite being comprehensive enough to teach you to reach scores of 250,000m or more. But most of the refinements above what is presented in this guide are difficult to describe, but instead come into play as instinct. With experience, you will learn that there are times when it’s optimal to deviate from some of the above guidelines. For example, later in the game, sometimes many pieces of the same shape will come in a row. When this occurs, it may be better to ignore normal stockpile maintenance (3 directions each reserved for its own shape), and instead form piles of opportunity. Only the essence will never change: Create 15,000m piles, double them, and use a stored attack piece to score.
Another approach to try is instead avoiding the autobahn even at the beginning of the game. With this method, you avoid the speed up from even the first autobahn, but in return, the Build Up phase will virtually require perfection, as you will have only one attack piece in storage instead of the two you end up with if you began with an autobahn. Using this, I have been able to achieve close to (within 10%), but not surpass, my record scores, but it may be something that works for you.
The Perfect Game
When you become competent at all the techniques, the game’s speed will be your only enemy (apart from bad luck). For you to reach the highest score you can possibly get, you need to score as much as possible, as quickly as possible. As your score rises, and as time goes on in a game, the game will become faster and faster, especially in the speed at which pieces appear and move, and the speed stockpiles fade. You will eventually reach a point where the game will be too fast for you, leading you to be unable to maintain your stockpiles or cash them in. So the ideal game would score as much as you could before the game became too fast. This means scoring as much as you can as fast as you can, spending as little time as possible in the build up phase. Maintain your x? maximum stockpile as long as you can. Transfer it if it’s in danger of fading away. Avoid autobahns unless you really need them, because they speed up the game and reduce the time you have available to score before the game becomes too fast for you.
Appendix: Stockpile Size Symbols
The game displays a symbol next to a stockpile that gives a indication to how large it is. The symbol starts off ’empty’, but will fill with color as it grows in size. Once it becomes solid, it will advance to the next symbol. Each successive symbol (up to solid circle/Max) represents about double the previous symbol’s value. Here is a list of the symbols, from smallest to largest in the size of stockpile they represent.
- Triangle
- Square
- Pentagon
- Hexagon
- Circle
The Circle is unique in that once it is filled, “MAX” will appear. But this is actually not the maximum sized stockpile. If you continue to add to it, eventually you will see “MAX x2”, “MAX x3”, up to “MAX x9”, each which represents a multiple over the size of the solid circle stockpile.
But that’s not all. After “MAX x9”, “MAX x?” will appear, and even after you first see this, the stockpile size can still be increased, although the game will no longer indicate how much larger the stockpile has become, unless you cash it in. The true maximum sized stockpile is one that is worth just about 15,000m, which will require you to substantially continue to increase the size of the stockpile after you first reach “MAX x?”.
My Record
My personal record is 699,394. However, I no longer play this game as often as I used to, so I’m sure this will fall to someone with more dedication and better reflexes than me.
[…] https://crackedrabbitgaming.com/guides/gba/digidrive/faq/ Share this page:These icons link to social bookmarking sites where readers can share and discover new web pages. […]