Written by Tommy Gun. Screenshots taken by Tommy Gun. Last updated: 9/04/06
 Orbital is one of the seven “bit Generations” games made by Nintendo for the GBA. It’s sort of a cross between Katamari Damacy and one of those physics-heavy outer space flash games. You control a star floating through space, and must use “attract” and “repel” to pull yourself towards, or push off of, other planets. Absorb smaller stars to grow bigger, and collect the sun to win the stage.
You can help support CRG by importing Orbital from Play-Asia (direct link) or YesAsia (direct link)!
I will change all the names if I get any real confirmation, so if anyone reads Japanese, email me!
Contents:
- Controls
- Your Star
- Free Floating
- Orbiting
- Hazards
- Absorbing Stars
- Satellites, and Small Stars
- Crashing, and The Pinball Effect
- The Sun, and Beating a Stage
- Scoring
- Lives
- The Moon
- Galaxies, and Unlockables
- “What’s the hardest stage?”
- “What’s that weird gray thing, or the lightning bolt?”
- Tips and Tricks
- Extra Info
Controls:
- A: Attract
- B: Repel
- Select: Free-look, or Look Mode
- Start: Pause
- D-pad: Look around while orbiting, or when in free-look.
Free-look pauses the game and lets you scroll through the entire stage.
Your Star (Gray):
You start off as a tiny gray star. As you absorb other stars, you’ll grow bigger (see Absorbing Stars section). You are the only gray star (when larger) to have multiple orbit rings. Here are screenshots of some of the various stages (to scale):

Free Floating:
Free floating is when you’re not in the orbit of a planet. You must use your attract and repel on other planets (oftentimes off screen) to guide you through space. Think of yourself as an electromagnet. You can choose to attract or repel (or do nothing and drift). Drifting is very useful, don’t feel like you always have to be pressing a button! Attract turns your orbit rings red, repel turns them blue. Here is a simple diagram of each. The dotted lines are colored where you should be holding a button:
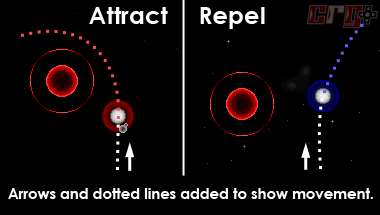
The larger planets affect your movement more, but if a smaller planet is closer to you, it will affect you more. Things get tricky when you’re going to crash into a planet and there is a smaller one next to you — do you repel away from the large planet, or attract to the small planet? These are things you’ll face and have to decide at a moment’s notice depending on the situation. (But to answer the question, if you’re close to the small planet, you should probably try to attract and orbit it, but it really depends on speed and the location of other hazards.)
At first you might think the stages are random and go on forever, but they’re not, they wrap. They’re actually fairly small.
Orbiting:
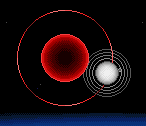 The planets each have an “orbit ring,” a red circle around them. If you enter this space, and are traveling at a certain angle (basically just not straight AT the planet) for a short distance, you will be “locked in” and orbit the planet. You will hear a sound to indicate it when it happens. Remember, entering a planet’s ring does not mean you’re orbiting! You must wait until you hear the sound, otherwise you might crash. It’s actually possible to float towards and away from a planet for a while, inside its ring, without orbiting, if your travel path is towards the planet.
Whether or not you’ll orbit has to do with the angle you’re traveling, and the distance you travel inside the orbit ring. There are some stages where planets are traveling at extremely high speeds, and you can still orbit them if you hit the rings at the correct angle. If it had to do with the amount of time inside the ring, this would not be possible.
The controls are very simple when you’re orbiting. Attract will bring you closer to the planet you’re orbiting, repel will push you farther out. The other planets don’t affect you (physics-wise) when you’re orbiting. Use this to your advantage. Use the d-pad to look around (free-look when necessary), and repel yourself when you’re moving in the direction you want to go. It takes a little time to break free of the planet’s gravitational pull, so remember to repel a bit early. If there are no other orbits, you can repel to the very outside and orbit, so it’s easier to time.
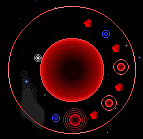 You travel faster the closer you are to the planet. So, if you’re orbiting a planet that has a star orbiting in the same direction, hug the planet to speed up and reach it, then repel to grab it. Take a look at this screenshot from a section of stage 13. Stay close to the planet and you’ll be safe, then once you’re close to the blue stars, repel to grab them. It’s pretty easy to weave in and out of the rocks.
When in the orbit of a planet, you are safe from that planet. You can hold down attract and touch the planet, and you will not crash into it. You can use this to your advantage when rocks are orbiting with you, and you need to dodge them by hugging the planet. But remember, other rocks orbiting that planet, and other objects in space, will still hurt you.
Smaller planets can orbit larger planets, and you can orbit the smaller planets while they’re orbiting! If fact, sometimes there will be a planet orbiting a larger planet that’s orbiting an even larger planet!
Orbit Hopping:
Orbit hopping (or jumping) is a technique where you repel out of one orbit, into another, and so on. This is mostly done when there are multiple planets close together, in a row or column. You can hop along one side of all the planets, or weave from one side to the other. This is a nice technique to maintain control, although if your timing is off you may crash into one of the planets. If there aren’t many planets opposite you, it might be easier to simply free float just outside the orbits.
Hazards (Red):
Hazards are red, and crashing into them will kill you (see Crashing section for more info). The three types of hazards are planets, rocks, and the sun (even when it’s yellow). The rocks can be singular, grouped in a cluster, or they can be in a ring. Either way, avoid them! Hazards may be free floating or orbiting a planet.
Rock clusters do not have orbit rings, and do not affect your movement! (It may look like they do, but it’s really the planets near them.) This means you cannot use repel to avoid them! Be aware of all the planets around you, and use them to move you around the rocks.
Here are some of the hazards:

Absorbing Stars, and Growing Bigger (Blue):

This is the main objective in each stage. You start out very small, and must collect blue stars to grow bigger. Guide yourself through space and run into the blue stars to collect them. Sometimes there are multiple blue stars, so you have a choice. Once you get one of them, you will be bigger and the other previously blue stars will turn gray (see next section). You must then locate the new blue stars (previously red planets).
Gray stars can also be absorbed, and they will make you grow as well. I’m not sure exactly what the formula is, but it seems to be a few big ones will make you grow, or a lot of little ones. Also, not every blue star makes you grow. I’m not exactly sure why.
Objects smaller than you are gray, the same size are blue, and larger are red.
There are some stages (e.g. Stage 9) where you can absorb every planet/star! This means the only thing left are rocks, and the sun. In this case the only thing with gravity is the sun, and it’s very weak! You will mostly be drifting through space, with little control. You can prevent this by grabbing the sun while there are still planets left.
As you grow, planets will affect your movement less, so you become a bit harder to control. Keep this in mind. You will have a larger orbit ring though, so it’s easier to collect satellites.
Satellites, and Small Stars (Gray):
Just like how you can orbit a planet, stars can orbit you. These are called satellites. To collect a satellite you must get close to a gray star without hitting it (or you’ll absorb it), and let it touch your orbit ring for a split second (at an angle). Basically the same as when you orbit a planet, but in reverse and you’re doing all the work. When you get close your rings will switch to a single orbit ring that is larger. You actually have a bit more room than it shows.

They can orbit in either direction, on any ring. By the end of the stage you could have many satellites, a moon, and the sun, all orbiting in different directions (they cannot crash into each other). Collect satellites for extra points (and lives, see Scoring section).
Crashing, and The Pinball Effect:
 When you crash, you will be sent in the opposite direction and lose one life. You will be invincible (indicated by your star flashing) for a short period of time, and can go through objects. You will stay invincible the whole time you’re “inside” a hazard. The problem is that often you will get sent straight into another hazard, losing another life, then sent back again into another hazard, and so on! I call this the pinball effect, and it can deplete your lives very quickly! Having the game restart you from a “safe zone” would have been a better solution, in my opinion. What can you do to counter this? Well, all you can really do is pay close attention to which direction you will be sent, and what objects are in that direction. If you crash into a planet and there is a rock cluster opposite you, hold attract and hope you stay close to the planet. If you crash into a planet with hazard orbits, and the space opposite you is clear, hold repel! You might be able to get away from the planet and its hazards. Really, it all depends on the situation, and you may not be able to control what happens.
The Sun, and Beating a Stage (Yellow):
The sun is yellow, and will appear once you’ve absorbed enough blue stars (two or three, usually, you must reach the same size as the sun). It varies in size depending on the stage. There is only one sun in each stage, and it starts as a red planet. In the later stages the sun has lots of rings (it’s the only object with multiple rings besides you). In the earlier stages it just “shines” (gradient around it). Here are a few screenshots:

Capturing the sun will end the stage, so collect everything you want (especially the moon if you’re going for those) before the sun. Unlike gray stars, you can crash into the sun, so be careful! If you’re chasing it around a planet (both of you orbiting), you’ll probably have to repel at the very end since you’re both moving in the same direction. If your star is very large, this may not apply.
When you capture the sun you will be invincible and the stage will end instantly. The reason this is significant is that it means you can “rush” the sun even if there are hazards on the other side of it, and as long as you successfully capture it, you won’t lose any lives. Of course, if possible, it’s better not to risk it in case you miss, but it’s something to remember.
Scoring:
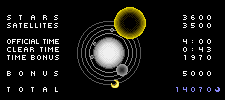 After the stage is over your score will be calculated. You get points for stars, satellites, a time bonus, and another bonus. Here is how they are calculated, after much trial and error:
Stars:
300 * stars
This is for absorbed stars. For every star you absorb you will get 300 points. The lowest number of points you can get is 300, since you must absorb at least one to finish the stage (usually more). Also, size doesn’t matter! (Ahem.) They’re all worth 300 points.
Satellites:
700 * satellites (the sun counts as a satellite, moon doesn’t)
Again, it doesn’t matter what size they are, or which ring they’re orbiting on. As you can see, satellites are worth more than twice as much as stars! You don’t get any bonus for being a giant star, so always go for satellites instead of stars!
Time Bonus:
It’s a very simple equation:
([official time] – [clear time]) * 10
It’s only confusing because the unit it’s calculated in is seconds. So if you get 2 minutes 30 seconds (2:30 = 150 seconds) under the official time, you will get a bonus of 1500.
Bonus:
You get 3000 bonus points if you complete the stage without crashing, and you get 2000 bonus points if you capture the moon. So, the only combinations are:
5000 No crashes + Moon
3000 No crashes only (no moon)
2000 Moon only (at least one crash)
Extra Lives:
Extra lives are directly related to how many satellites you collected. Pick up three, you’ll get three extra lives. Remember, the sun counts as a satellite, so you’ll always get at least one. In this case the moon also counts as a satellite.
If you didn’t already have enough reasons to get satellites, here’s another one! GET THEM!
Lives:
Your lives are shown in the top right corner. You start out a stage with five lives. If you gain lives at the end of a stage, they will carry over to the next. However, if you quit or restart a stage, you will be back to five. This is a good thing if you bombed on the previous stage — just restart and you’ll be back up to five. If you did really well on previous stage(s), it’s better to keep playing as long as you can. If you’re having tons of trouble with a certain stage, you could go back a stage or two (if you’re better at those), and rack up some extra lives first.
See the section above for information on gaining extra lives.
The Moon (Yellow):
 The moon is a special object. It looks like a tiny yellow crescent. There is only one in each stage, and it doesn’t appear until the end (when the sun appears). If you crash into the moon, it will be destroyed (rather than absorbed) and you’ll have to play the stage over from the beginning if you want another shot.
You only have to get the moon once, and you can go back and get it at any time (you must also complete the stage), and the moon will show on the stage select. Your score and time, however, are linked, and only the highest score is shown, with the time it took to get that score. So if you get a faster time, but a lower score, it will not be saved.
The game keeps track of which moons you’ve collected:
- At the beginning of the stage it will say “Stage X” with a moon icon after it if you’ve collected it.
- On the stage select screen the stage icons are yellow if you’ve collected the moon, and also have the moon icon next to the stage number.
If you get every moon in a galaxy, the galaxy icon will turn yellow on the galaxy select screen.
If you don’t care about score or extra lives, you might try growing as much as you can before attempting to pick up the moon, that way your orbit ring is larger and it may be easier.
Galaxies, and Unlockables:
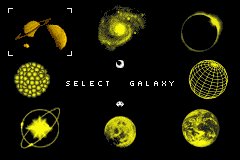 There are 6 main galaxies, with 5 stages each, for a total of 30 main stages. Completing all of them will unlock another galaxy with 5 “extra” stages. Collecting the moon in all of those stages will unlock one more galaxy with 5 “final” stages. Completing the final galaxy will unlock Ending’ — the same credits but with a new song, and tons of swarming UFOs. Collecting the moon in every final stage will unlock…nothing. :( But you’ll feel really awesome I bet.
Update! After finishing this FAQ I sat down with my GBA SP and beat all the main stages in one run, ending with 30-40 extra lives (you lose them once you get the credits). I missed four or five moons, so I went back and got those, then beat the Extra Galaxy. The next day I worked on the Final Galaxy, and beat them all with the moons! So as of 9/04/06, I have actually and officially beaten the game and collected every moon. I had so much practice from writing this FAQ it really didn’t take long, heh.]
“What’s the hardest stage?”
That really depends. Some stages require a lot of a certain technique (e.g. orbit hopping), so if you’re bad at that, that stage will be hard for you. Others give you only one planet, so you barely have control — at least at first. After you figure out the best routes, the stages get much easier. Then there are other stages with no easy patterns, and stuff is flying everywhere, so it may be more based on luck. With practice, you should be able to beat them all. Even the Final Galaxy isn’t that hard since I figured out some better strategies.
“What’s that weird gray thing, or the lightning bolt?”
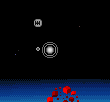 I really don’t know. I think they’re just little background effects or something. The lightning bolt bounces off of planets, and eventually disappears. The gray UFO just hovers around for a bit, and then disappears when it goes off screen, it seems. I’ve run into it, and nothing happens, you go right through it. So as far as I can tell, they don’t do anything.
Tips and Tricks:
- If you’re orbiting a planet and can’t get to the next object because of a hazard, you can try going the opposite direction and wrapping around the stage to come from the other side. You can always use free-look to get a sense of the stage.
- Be patient. If you’re orbiting a planet, use free-look. Wait until the timing is right before you leave, don’t rush it.
- Sometimes it’s easier to orbit in the opposite direction if there are hazards orbiting. Repel to a different planet to switch directions (do a figure-8) and then come back.
- If there is a group of planets close together, it’s probably easier to go around the outside of them (using attract), rather than through the middle where there are conflicting gravities.
- Sometimes crashing is acceptable. If there’s a hard to reach blue star, and you can get it by crashing, you might want to go for it. You can always collect satellites to make up for it. If you’re going for a high score, you’ll lose the bonus, though.
- If you’re going for moons, watch out for the sun! There have been many times when I accidentally captured the sun, and ended the stage. If you have a lot of lives and can’t avoid the sun, crash into it!
Extra Info:
- After you beat the stage “Extra 5” you will be on Stage 1 again (unless you got all the moons).

[…] – A while back I passed along a FAQ for The Zombie vs. Ambulance. Well, the same guy just completed another, this time for the bitGenerations game Orbital. […]