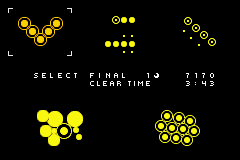
 In order to better understand the diagrams, please read this note.
If you like this check out our other Orbital guides!
Final 1
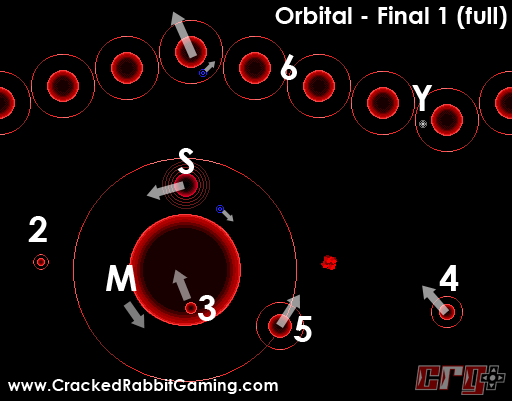
Note: [6] applies to ALL those planets in that row.
This screenshot doesn’t do justice to how chaotic this one can get. All of the [6] planets are moving, and at different speeds so they spread apart (you can see them just starting to spread here). They overlap the main planet, which means you’ll have to dodge them if you’re orbiting it. At the beginning you can orbit hop if you want, but it may be better to drift down instead, since there will be a big mess on the main planet. The thing that makes this a little harder is the number of stars you have to grab….
Required for Sun: [4] [1] Go for either. The main planet is easier to get to, then just orbit to grab [1], but you’ll have to dodge stuff.
[2] Stays still. Not too hard to get. [3] Don’t let the screenshot confuse you. It just happens to be behind the main planet. It’s linked to the [6] below it. You can try orbit hopping to the [6] if you want, then drift straight up. It might be easier to intercept it though, going down. [4] Kind of the same deal as [3]. Once you get this one, I would definitely recommend grabbing [5] if it’s near you! It’s easy to get, and it will allow you to absorb every [6], which means you don’t have to worry about any of them! This greatly simplifies the stage. You’ll grow with a [6], and then you can collect the rest as satellites.The moon and sun are both really easy to get, thankfully.
Final 2
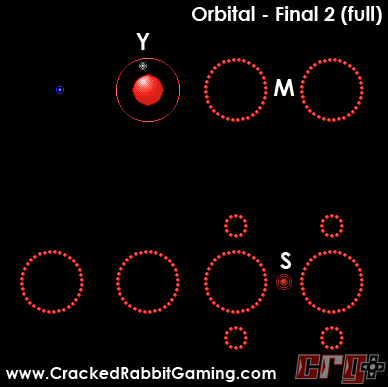
Looks pretty small and simple, right? Remember that it wraps around, which means it’ll feel a bit different when you’re playing it. This stage is the king of the pinball effect. You only have one planet, so you don’t have much control, and there are tons of hazards. The sun and moon are stuck between two rings. One thing to remember is that the sun DOES have gravity. In most stages you don’t even notice, but since there’s only one planet here, there isn’t as much to conflict. Use the sun!
Required for Sun: [1]
This one is hard to explain in text, and there’s a LOT of wrapping going on, so here’s a diagram to show you some paths. There’s only one star to get, and that’s between the (A) and the (1).
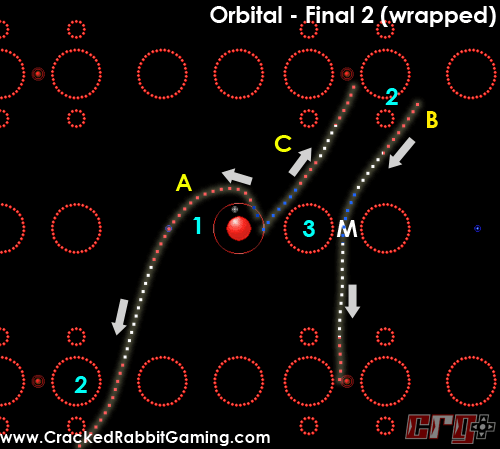
It’s theoretically possible to do this flawlessly in one run, of course. However, getting the moon without crashing is very difficult, and it’s better to get the moon and crash than destroy it and not crash. Here is the single run:
[1] Follow path (A). Don’t aim straight for it. Go up-left, then use attract (1) to pull yourself down and around. This way you’ll have more control. You can actually just hold repel right as the stage starts, then attract as soon as you break orbit. It should be a pretty slow curve, so aiming for [1] is easy. If you miss just restart. [M] You may have to repel off of the planet a little to avoid the hazards, it depends on how you did [1]. Drift down and use attract (2) on the sun to pull yourself around under it. On the diagram we have wrapped around up to path (B). Drift over, then use repel (3) off of the planet to avoid hitting the ring, and get the moon. As I said, you’ll probably crash, but that’s okay. If not: [S] Continue drifting straight down and you’ll grab the sun. You can attract or repel off of it if you’re not lined up perfectly.If you crashed getting the moon, or missed the sun:
[S] Get back to the planet and try this. If you’re orbiting clockwise, go down, otherwise, go up. In the diagram (C) we are going up, but the path is the same just mirrored. Release on the right side of the planet, and repel just barely missing the ring. Hold attract to slow yourself down, then drift a little ways. As you’re coming up on the sun, hold attract to curve yourself to it! If you miss again, get back to the planet and try again. You can always go the long way again (AB) if it’s easier for you.Final 3
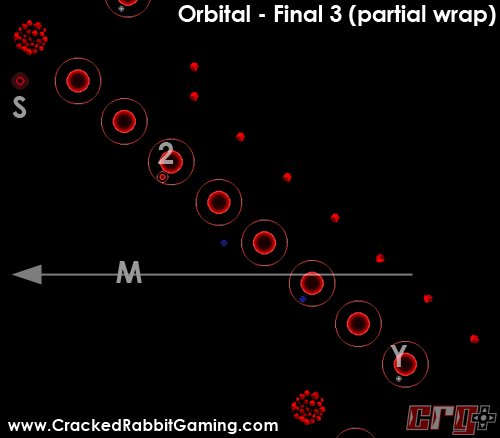
This image is wrapped partially, and scaled down a bit. This only shows each planet once (besides the top and bottom), whereas in the real stage you would see each planet wrapped many times. This stage changes dramatically because the planets are moving very fast. It seems impossible at first, but it just takes practice. Lots of practice. One mistake and you’re pretty much dead, as you’ll drift through space hitting stuff, and maybe orbit if you’re lucky.
There is one technique you must get really good at: orbit hopping! The planets overlap each other, which means you want to release early — not at the top or bottom! Release from the left corner, and wait until the next planet is just to the left of you. It doesn’t matter what speed you’re going, as long as you hit the orbit ring you’ll catch. Basically just hop from planet to planet until you complete it. See the large rock cluster? Don’t go that way. You can, but it’s not recommended.
The single rocks will go through the top and bottom of the orbit rings — hug the planets while orbiting and they won’t hit you, regardless of your size.
Required for Sun: [2] [1] The top one is locked to the planet to the right of it, the other is orbiting. I’d go for the second one because it’s closer and it’s safer. You can actually release and drift up to it directly at the beginning if you want, just restart if you mess up. To do it, hold repel just before you reach the left side of the starting planet, then let go when you break orbit. You’ll float up and orbit the [1] planet. Easy.
[2] Now just orbit hop up to it. [M] The moon is drifting left, intersecting a planet. Get to the planet just above it and orbit until you catch it. The moon travels very fast, so just wait it out and you’ll be able to get it without doing anything, eventually. [S] Locked to the planet to the right of it. Get to that planet, and free float to it. Remember to release early!Final 4
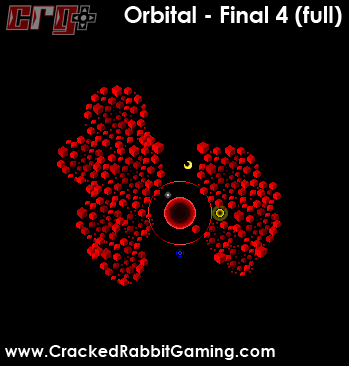
Note that I mixed screenshots here, so you can see the moon and the sun. Otherwise, the sun is pretty hidden and you might not even notice it. I didn’t label this one because there are only four things, and they’re obvious.
Looks pretty hard, eh? Well, it is. There’s only one planet, with huge rocks, and not only are there rocks overlapping the orbit, but there’s a rock IN the orbit so you can’t even go all the way around! It’s possibly the hardest stage in the game, at least until you figure out the good routes. Now this one is pretty easy.
It’s easy to restart this one since there isn’t much to get, so you should be able to handle it. Take a look at the diagram:
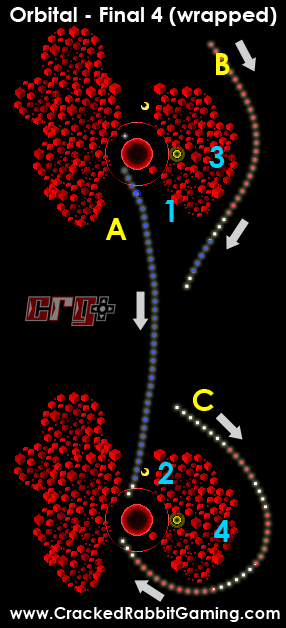 Required for Sun: [1]
Note: If at any time you do crash, use it to your advantage! You can go through the rocks, so hold attract to direct yourself where you want to go while you have completely free movement!
Watch the rocks that overlap the orbit! If you start an orbit, be sure you’re close to the planet! If not you will crash.
[1] Path (A). Hold repel to break orbit and grab [1]. If you time it perfectly, you can keep holding repel (1) all the way down, and you will start repelling through (2), pushing you back to the left where you will capture the moon! Then you can orbit. I would really recommend trying this, just keep restarting if you miss. If that’s not working for you, try: [M] You MUST go down to get the moon. Orbiting the planet to grab the moon does NOT work, you will hit the rocks (trust me). You might be able to grab it after the crash, but really, it’s much easier to go down. If you missed the moon using the first method, try path (B). To get there (or C) just use the planet to move you down/right, then drift until you wrap around. There are many other ways of getting there.Remember that the sun has gravity, so you can use it to go around the rocks on the right side. Attract around the rocks using the sun (3), then repel off (1) to get your angle right. (I didn’t draw the full path.) Drift down towards the moon, then quickly attract or repel if you’re going to miss. You should be able to orbit.
[S] Just orbit the planet clockwise, then tap repel right at the sun to capture it (otherwise you’ll hit the overlapping rocks). There are a few ways to get into orbit. One is path (C). Attract around the sun, but make sure it’s a little wide as shown, otherwise you won’t make it. Another option is basically going the opposite direction on (C) and traveling up.Final 5
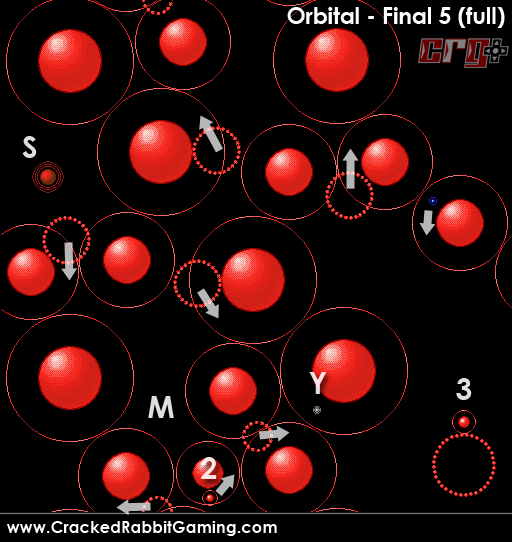
Surprisingly, the last stage in the game isn’t so bad. Update: Okay, I kind of take that back. Now that I’ve played it some more, it’s annoying. There are so many conflicting gravities, and lots of ring hazards, you can really die quickly if you make one mistake.
I hope you’ve honed your orbit hopping skills by now. The pinball effect is in full force here, so just take it slow when you’re in a safe orbit. Use the screenshot to help, and use free-look. Watch out for the orbiting rings — as soon as you grab [1] and [2], get out of the orbit!
Required for Sun: [3] [1] Break orbit when you get to the bottom-right corner of the starting planet, then hold attract to stay near the planets on the left. You should be able to grab [1] without getting hit, then quickly get out of there.
[2] I usually go left from [1], then just orbit hop till you get to it. Find a route that works for you. [3] This one is pretty easy to get. Just orbit one of the planets to the side, then release and travel left or right to grab it. [M] Similar to [2]. [S] No real tips here, it’s not very hard. It’s harder to get TO the sun without dying than it is to actually capture it.Congratulatons on finishing the game!
